
Thanks for signing up for my email newsletter! So, you wanna make better pet photos, huh? Cool. You got this. Maybe. It IS hard, but here are my Top 5 Tips and two bonus ideas you can try and I’ll bet money they level up your game. I’m gonna suggest you work at it AND think carefully about what you’re doing. If you DO, you’ll be great in no time. Rome wasn’t built in a day. Perhaps most importantly, have fun with your pet while you do it!
Do we agree that there’s a difference between a good photographer and a bad one? What’s the difference? A little knowledge, mindfulness and experience. It’s NOT the camera any more than a good oven is responsible for a delicious dinner. Just for this, let’s call the bad one a “camera owner”. You’re no longer a camera owner. You are now a mindful, creative, talented and soon-to-be-masterful “pet photographer”.
Since MOST people are MOST interested in dogs, this will cater to them, but the lessons apply to your other pests, too 😉
Let’s get started.
Tip #1: Lay on Your Belly
Really? Yes. Do it now! There’s lots of reasons not to lay on your belly, but I find my very best pet photography work is done holding the camera at eye level with my subject.
Now that you’re interested in making effective pet photographs, it’s time to stop shooting your pet sitting on the floor while you’re standing on your feet a few feet in front of her like a camera owner. While it’s not impossible to shoot a good pet portrait from this 45 degree down angle, it’s truly a lot harder and what works is specific, beyond the scope of these tips. It’s also what every camera owner does and that means it’s probably boring.
My belly gives me a more flattering angle, better eye contact and connection in the portrait, it makes the subject more impressive/larger/powerful and allows the possibility of utilizing depth of field to eliminate background distractions (see Tip #5).
Camera Owners have trained us to dislike photos taken from a 45 degree down angle (by repeatedly showing us bad ones). They’re categorically bad images. Not considered or well executed.
But why are they bad? Camera owners haven’t learned composition. The subject is usually in the center of the frame. Boring. Often too small. Sometimes the subject isn’t in the center and isn’t well placed either. Sometimes an important body part of the subject is cut out of the frame, without intention or attention as to how. That’s unsettling, even if subconsciously. Another reason they’re bad? Failure to incorporate these 5 Tips. Because most camera owners aren’t halfway decent, mindful, considerate pet photographers like you are now, right? Right.

What about “live view”? Live view is simply shooting while looking at a preview of the image in the back of the camera or phone. I’m not a big fan, but if you’re using a cell phone, it’s your only option. Perhaps I’m just an old school photographer, but I find I rely on the camera’s autofocus and my fat finger isn’t able to accurately select them in live view. With the camera, I can preselect based on my composition. I find lying on my belly supported by my elbows with my eye to the camera’s viewfinder and thumb on the buttons in back works best. Cell phone users must use live view because cell phones don’t have a viewfinder.
Finally, energetically, it’s more friendly of you to be at your pet’s level than towering from above and that’ll contribute to pet’s comfort (Tip #3).
Give it a try! Try it on a few separate occasions as your pet may need to get used to the idea (and to your camera) and realize that you laying on your belly is not always an invitation to make out with you. I’ll bet you love the results! In fact, please tell me how it goes!
Tip #2: Get Their Attention
If this dog were bored, staring off into space, it just wouldn’t be a sweet portrait, right?

Make it fun for your pet. Use treats and toys and your voice to trigger your pet’s interest and get their very best playful expressions.
If you and your pet practice basic obedience (you really must), you can make photography an extension of your obedience practice. You can make great use of “sit”, “down”, “stay” and “come”. Don’t forget the hand signals you learned in class. This is how I realized I was becoming a pet photographer as it was happening!
Thinking of this as playing with your pet rather than something you’re trying to make your pet do will make it exponentially more enjoyable for them and encourage them to offer you their best expressions because you’re their world and playing with you is the best thing ever! The moment you feel a tinge of frustration, let it go completely or take a break rather than inflict that energy on your pet. You won’t like the expressions she gives you in return anyway. Regroup. Try again remembering what worked well and what didn’t. In dog training we always go back to the last point of success and try again after considering what went wrong and what we might do to make things go right. Remember, you’re in control! Sometimes ending the session (photo or training) is the best thing you can do.
Beware of hyper-focus on food. That’s not an interesting expression. Grab a toy instead. You can even salvage the squeaky bit from a chewed-up squeaky toy. It looks like this (the small cylinder on the right).

Wash it and work with it in your mouth! As you blow air out through it, it whistles one tone. As you suck air in through it, it whistles in another tone. Congratulations. You are now a squeaky toy with ALL of your pet’s attention. Caution: don’t teach yourself how to use it in your pet’s presence. It will only work well as a photo aid when your pet isn’t expecting it.
Tip #3: Mind THEIR Comfort
Your camera’s lens is The Eye of Sauron.
Animals are instinctually averse to a direct stare. It’s a threat in the wild. Remember “Watch me” training? And what’s a camera lens if not a big, unblinking stare? If you’re not a Lord of the Rings fan, Sauron is the big bad who’s earthly manifestation is a giant, unblinking eye rimmed in flames atop a towering, pinnacle of obsidian in the darkest depths of Mordor. The eye (I’m equating it to your camera) is constantly searching for the heroes. There is no place to hide. It is terrifying.

Image compliments of Google AI
Dedicated time for the pet to “meet” your camera and sniff it and receive a treat or two while in close proximity, or even a treat or two that are resting on your camera while you’re not holding it will help them feel a lot more comfortable while you are holding it, aiming it (staring) at them. “Remember, click means treat”. It’s gotta be a neutral, acceptable thing to your pets, if not a positive one.
All the other facets of comfort count as well. Is it too bright with the sun in her eyes or does the sun make it too hot? Is there something comfortable (for your pet, not you, silly) to lay upon? Is that ice cold floor tile tolerable on your dog’s not-so-hairy tummy and undercarriage? Does she have water? Do you have treats around? Basically, your job here is to remove your pet’s excuses to not sit and stay and pay attention while you seem to be giving all your attention to that little camera thingy instead of to her.
Tip #4: Use Light
Photography literally means “drawing with light” in ancient Greek. Socrates, Plato, Aristotle and their friends all had beautiful cameras! But seriously, to make photos with depth, interest and creativity we must literally learn to see the light. Turn OFF your flash and let’s… focus. ;)
Choose the largest light source available to you. The very best light source according to most photographers is a cloudy sky. Open windows and doors work well too. So do lamps. The key is seeing the direction the light is travelling to your subject from the source. It’s best if that direction passes over one of your shoulders, from above, so that it hits your subject at a 30 to 60 degree angle. In this example your pet is “subject on rocks” and “48-inch octa” is your light source, but it could be a window or a lamp, etc.

Image compliments of rangefinderonline.com
Why did I ask you to turn off your flash? Well, it’s literally the least attractive light source available and camera owners use it to make boring photos. It’s useful to fill-in shadows under hat brims outside on a bright sunny day, but due to shining on the subject from exactly the same spot as the lens, it’s unable to create any depth. It’s just gonna light it up, which is good for visibility, but not flattering or interesting. Yes, it’s simpler and if you want your photos to look like every other camera owner’s…
Different light sources have different colors that can affect your image. The basic ones are: direct sunlight, shade, cloudy sky, fluorescent and incandescent bulbs and flash. Most cell phones and cameras do a fine job of knowing the difference in color of these different kinds of light and representing them faithfully in the images. Most do it automatically. Sometimes they have trouble if there are 2 competing light sources of different color like a lamp in a room lighting a subject while the sun is also stream in through a window. When they fail, you get a white balance issue. Ever see a photo made indoors where everything looks super cold, even blue? What about a shot outdoors where everything looks just way too warm, orangy? Those are common white balance issues and any more on white balance beyond the scope of a 5 Tips article, but the Internet has a lot to say about it if you’re having issues. And now you’re aware of it too.
Next, learn to adjust your exposure manually. Don’t worry. This is not that hard. With modern cell phones, you can do this with a touch and a swipe on your screen (directly over the subject’s face). Remember, any time you let the camera or phone make a decision for you, you’ll get what some Japanese engineer in a 4th floor Tokyo office building thinks is normal and totally worthy of a camera owner. Reference your phone’s make and model number in your Google search if you want to know more about the phone’s camera. If you shoot a DSLR, your camera’s manual is your friend. If you’re 40 or older, we all lived through a time when technology manuals were badly written by that guy on the 4th floor, who happened to have very little grasp of the English language. Today (and since about 2005) camera manuals read like a Photography 101 textbook. It’s your new best friend. Read it!
Tip #5: Keep the Background Simple
Clean up the area behind your pet if it’s going to be in your frame. Does that broom leaning against the wall add to your photo’s feeling or composition? Probably not, unless your pet is wearing a Wicked Witch costume, right? Same goes for the sock on the floor, the overflowing trash can and the coffee cup. Any out of place items gotta go. Pretend, as my mom used to say, that The Queen is coming for tea. Make the place look that good. It’s the same lesson I learned as a 14 year old in hunter/gun safety class - watch (what’s going on in) your background! Anything that detracts from the subject should be moved or removed or you can select a different location for the photo. As the photographer, you’re in control of EVERY element in the shot.
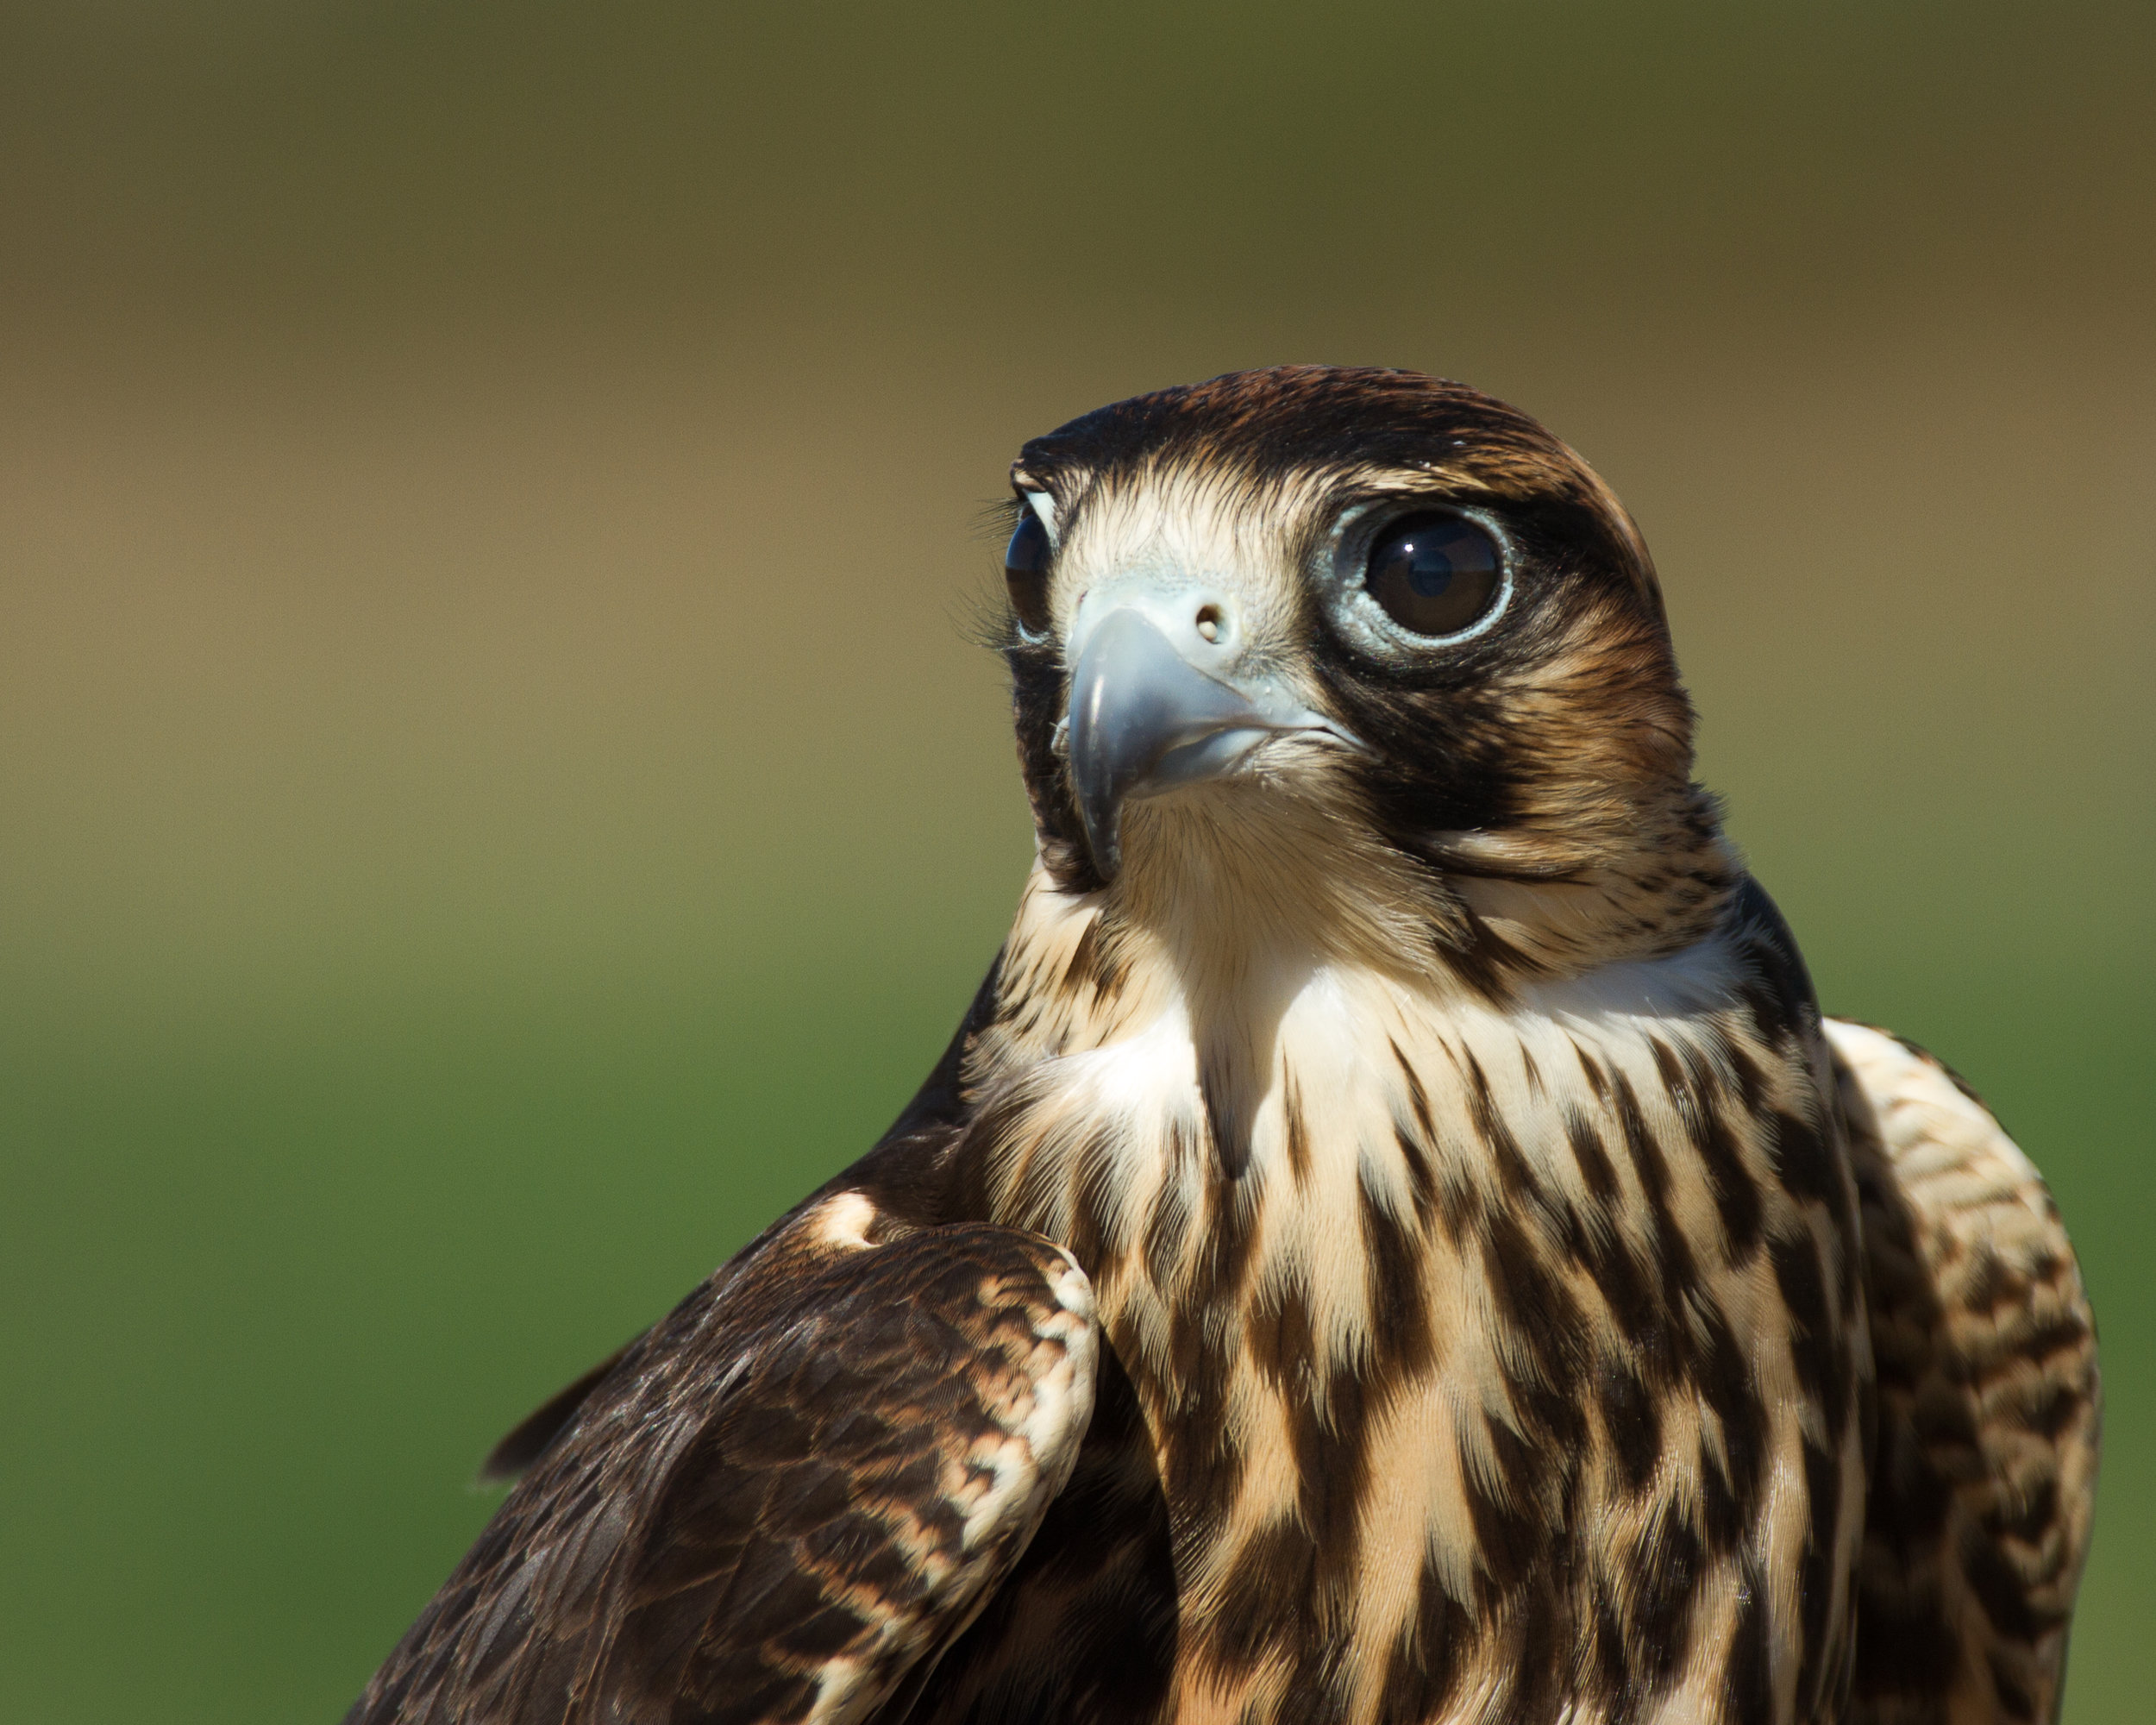
More advanced DSLR photographers can open the aperture to control the depth of field and to blur the background as I have done with this falcon. Dear cell phone users, there’s an app for that! Isolate the subject to bring more attention to your pet so they really shine in your photos! The term of a beautifully out of focus background is “bokeh”, the Japanese word for haze or fog. Yeah, I’m obsessed with Japan and I love the Japanese language and any opportunity to share it!
Thanks for reading these tips. I really hope they are helpful and welcome hearing about your experiences with them! I invite you to share with me about your experience. Feel free to send me an image for a free critique!
Bonus #1: Focus on the Eyes
This is important and could really be Tip #6, but giving 2 bonus tips seemed better for you than offering my Top 7 Tips for Better Pet Photography.
In short, focus on the eyes. Not the tip of the nose, not the ears, not the foot or the tail, not the refrigerator in the background. The eyes are the window to the soul and a portrait is a capture of the soul. This is another reason I opt out of live view. It’s too hard to touch just the eyes in the back of a phone or even in the back of a camera while attempting to focus. The viewfinder makes it easy.
Bonus #2: Take a Class
Ya, this might be slightly self-serving. I have been teaching pet photography since 2013 and I cover these things and FAR more in class. Another benefit of a class is the one-on-one instruction, live dog models, Q&A, and image critique, which was invaluable to me as I got started as a photographer. There are SO many other tips and tricks that just don’t fall into a Top 5 or even a Top 10 Tips list.
Super Secret Bonus Tip #8
Hire a professional. Ya, this one is much more blatantly self-serving. I’m counting on you realizing that this is hard to do well and that you appreciate me for offering you a great learning experience that allowed you to come to this conclusion yourself.

Other reasons to hire me include: consistent results and professionalism, animal communication ability, timely delivery, a well-defined artistic style and skillful execution, top of the line photo gear, a carefully curated image collection made to your specification - saving you a TON of time, a satisfaction guaranty and a carefully selected roster of quality printed products to print your images on so you can display and flaunt them for the rest of the time you’re here on Planet Earth.
Did you have fun? I want to hear all about it! Email me? Also, you can schedule and Book your Free Consultation or a Pet Photo Session RIGHT HERE.